在本教程中,你将学习如何构建一个可以连接到 MCP 服务器的 LLM 驱动的聊天机器人客户端。建议先完成 服务器快速入门 教程,了解构建第一个服务器的基础知识。Documentation Index
Fetch the complete documentation index at: https://mcp-cn.ssshooter.com/llms.txt
Use this file to discover all available pages before exploring further.
- Python
- Node
- Java
- Kotlin
- C#
你可以在这里找到本教程的完整代码。将密钥添加到 将 你可以在这里找到完整的 客户端将: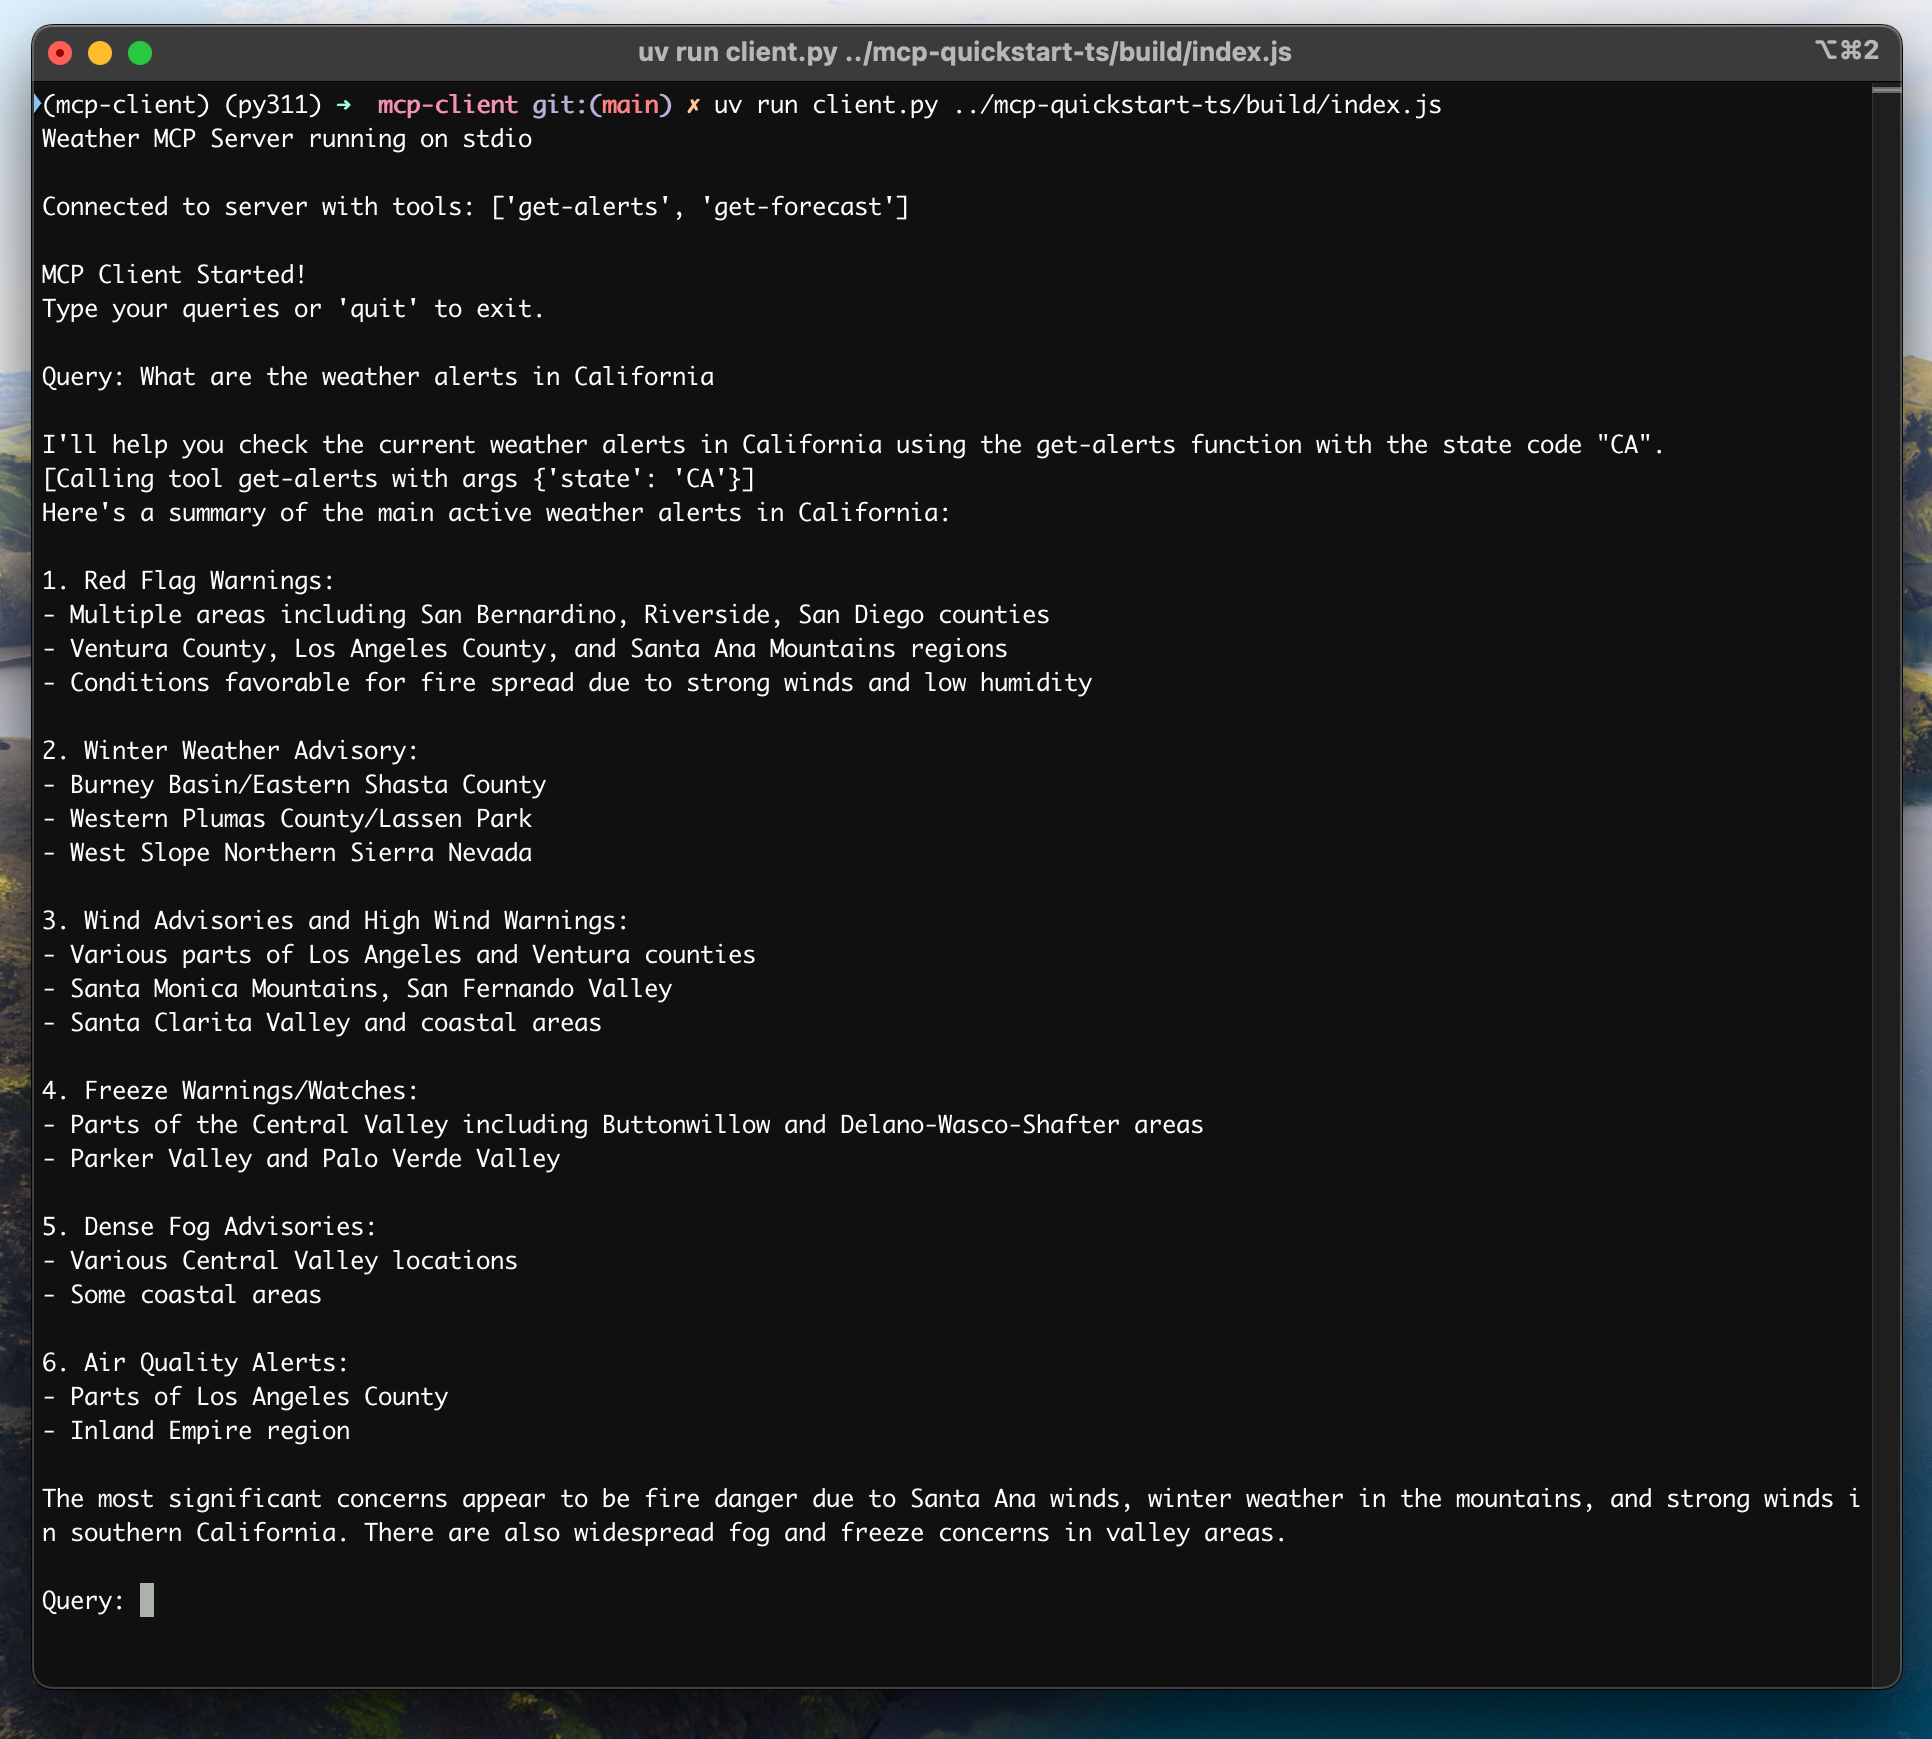
系统要求
在开始之前,请确保你的系统满足以下要求:- Mac 或 Windows 电脑
- 已安装最新版本的 Python
- 已安装最新版本的
uv
设置环境
首先,使用uv 创建一个新的 Python 项目:# Create project directory
uv init mcp-client
cd mcp-client
# Create virtual environment
uv venv
# Activate virtual environment
# On Windows:
.venv\Scripts\activate
# On Unix or MacOS:
source .venv/bin/activate
# Install required packages
uv add mcp anthropic python-dotenv
# Remove boilerplate files
rm main.py
# Create our main file
touch client.py
设置 API 密钥
你需要从 Anthropic Console 获取一个 Anthropic API 密钥。创建一个.env 文件来存储密钥:# Create .env file
touch .env
.env 文件中:ANTHROPIC_API_KEY=<your key here>
.env 添加到 .gitignore:echo ".env" >> .gitignore
确保安全保管你的
ANTHROPIC_API_KEY!创建客户端
基本客户端结构
首先,让我们设置导入并创建基本的客户端类:import asyncio
from typing import Optional
from contextlib import AsyncExitStack
from mcp import ClientSession, StdioServerParameters
from mcp.client.stdio import stdio_client
from anthropic import Anthropic
from dotenv import load_dotenv
load_dotenv() # load environment variables from .env
class MCPClient:
def __init__(self):
# Initialize session and client objects
self.session: Optional[ClientSession] = None
self.exit_stack = AsyncExitStack()
self.anthropic = Anthropic()
# methods will go here
服务器连接管理
接下来,我们将实现连接到 MCP 服务器的方法:async def connect_to_server(self, server_script_path: str):
"""Connect to an MCP server
Args:
server_script_path: Path to the server script (.py or .js)
"""
is_python = server_script_path.endswith('.py')
is_js = server_script_path.endswith('.js')
if not (is_python or is_js):
raise ValueError("Server script must be a .py or .js file")
command = "python" if is_python else "node"
server_params = StdioServerParameters(
command=command,
args=[server_script_path],
env=None
)
stdio_transport = await self.exit_stack.enter_async_context(stdio_client(server_params))
self.stdio, self.write = stdio_transport
self.session = await self.exit_stack.enter_async_context(ClientSession(self.stdio, self.write))
await self.session.initialize()
# List available tools
response = await self.session.list_tools()
tools = response.tools
print("\nConnected to server with tools:", [tool.name for tool in tools])
查询处理逻辑
现在让我们添加处理查询和处理工具调用的核心功能:async def process_query(self, query: str) -> str:
"""Process a query using Claude and available tools"""
messages = [
{
"role": "user",
"content": query
}
]
response = await self.session.list_tools()
available_tools = [{
"name": tool.name,
"description": tool.description,
"input_schema": tool.inputSchema
} for tool in response.tools]
# Initial Claude API call
response = self.anthropic.messages.create(
model="claude-3-5-sonnet-20241022",
max_tokens=1000,
messages=messages,
tools=available_tools
)
# Process response and handle tool calls
final_text = []
assistant_message_content = []
for content in response.content:
if content.type == 'text':
final_text.append(content.text)
assistant_message_content.append(content)
elif content.type == 'tool_use':
tool_name = content.name
tool_args = content.input
# Execute tool call
result = await self.session.call_tool(tool_name, tool_args)
final_text.append(f"[Calling tool {tool_name} with args {tool_args}]")
assistant_message_content.append(content)
messages.append({
"role": "assistant",
"content": assistant_message_content
})
messages.append({
"role": "user",
"content": [
{
"type": "tool_result",
"tool_use_id": content.id,
"content": result.content
}
]
})
# Get next response from Claude
response = self.anthropic.messages.create(
model="claude-3-5-sonnet-20241022",
max_tokens=1000,
messages=messages,
tools=available_tools
)
final_text.append(response.content[0].text)
return "\n".join(final_text)
交互式聊天界面
现在我们将添加聊天循环和清理功能:async def chat_loop(self):
"""Run an interactive chat loop"""
print("\nMCP Client Started!")
print("Type your queries or 'quit' to exit.")
while True:
try:
query = input("\nQuery: ").strip()
if query.lower() == 'quit':
break
response = await self.process_query(query)
print("\n" + response)
except Exception as e:
print(f"\nError: {str(e)}")
async def cleanup(self):
"""Clean up resources"""
await self.exit_stack.aclose()
主入口点
最后,我们将添加主执行逻辑:async def main():
if len(sys.argv) < 2:
print("Usage: python client.py <path_to_server_script>")
sys.exit(1)
client = MCPClient()
try:
await client.connect_to_server(sys.argv[1])
await client.chat_loop()
finally:
await client.cleanup()
if __name__ == "__main__":
import sys
asyncio.run(main())
client.py 文件 here.关键组件解释
1. 客户端初始化
MCPClient类初始化时进行会话管理和 API 客户端配置- 使用
AsyncExitStack进行资源管理 - 配置 Anthropic 客户端以进行 Claude 交互
2. 服务器连接
- 支持 Python 和 Node.js 服务器
- 验证服务器脚本类型
- 设置正确的通信通道
- 初始化会话并列出可用工具
3. 查询处理
- 维护对话上下文
- 处理 Claude 的响应和工具调用
- 管理 Claude 和工具之间的消息流
- 将结果组合成连贯的响应
4. 交互界面
- 提供简单的命令行界面
- 处理用户输入并显示响应
- 包含基本错误处理
- 允许优雅退出
5. 资源管理
- 正确清理资源
- 处理连接问题的错误
- 优雅关闭程序
常见自定义点
-
工具处理
- 修改
process_query()以处理特定工具类型 - 添加工具调用的自定义错误处理
- 实现工具特定的响应格式
- 修改
-
响应处理
- 自定义工具结果的格式
- 添加响应过滤或转换
- 实现自定义日志记录
-
用户界面
- 添加 GUI 或 Web 界面
- 实现丰富的控制台输出
- 添加命令历史或自动补全
运行客户端
使用任何 MCP 服务器运行你的客户端:uv run client.py path/to/server.py # python server
uv run client.py path/to/build/index.js # node server
如果你正在继续服务器快速入门中的天气教程,你的命令可能类似于:
python client.py .../quickstart-resources/weather-server-python/weather.py- 连接到指定的服务器
- 列出可用工具
- 启动一个交互式聊天会话,你可以:
- 输入查询
- 查看工具执行
- 获取 Claude 的响应
工作原理
当你提交查询时:- 客户端从服务器获取可用工具列表
- 你的查询连同工具描述一起发送给 Claude
- Claude 决定使用哪些工具(如果有的话)
- 客户端通过服务器执行任何请求的工具调用
- 结果返回给 Claude
- Claude 提供自然语言响应
- 响应显示给你
最佳实践
-
错误处理
- 始终在 try-catch 块中包装工具调用
- 提供有意义的错误消息
- 优雅处理连接问题
-
资源管理
- 使用
AsyncExitStack进行正确的清理 - 完成后关闭连接
- 处理服务器断开连接
- 使用
-
安全性
- 将 API 密钥安全地存储在
.env中 - 验证服务器响应
- 对工具权限保持谨慎
- 将 API 密钥安全地存储在
故障排除
服务器路径问题
- 仔细检查服务器脚本的路径是否正确
- 如果相对路径不起作用,请使用绝对路径
- 对于 Windows 用户,请确保在路径中使用正斜杠(/)或转义的反斜杠(\)
- 确认服务器文件具有正确的扩展名(Python 为 .py,Node.js 为 .js)
# Relative path
uv run client.py ./server/weather.py

# Absolute path
uv run client.py /Users/username/projects/mcp-server/weather.py

# Windows path (either format works)
uv run client.py C:/projects/mcp-server/weather.py
uv run client.py C:\\projects\\mcp-server\\weather.py
响应时间
- 第一个响应可能需要长达 30 秒的时间返回
- 这是正常的,发生在:
- 服务器初始化期间
- Claude 处理查询期间
- 工具正在执行期间
- 后续响应通常更快
- 在此初始等待期间不要中断进程
常见错误消息
如果你看到:FileNotFoundError: 检查你的服务器路径Connection refused: 确保服务器正在运行且路径正确Tool execution failed: 验证工具所需的环境变量是否已设置Timeout error: 考虑增加客户端配置中的超时时间
你可以在这里找到本教程的完整代码。更新你的 在项目根目录中创建一个 将 客户端将:
系统要求
在开始之前,请确保你的系统满足以下要求:- Mac 或 Windows 电脑
- 已安装 Node.js 17 或更高版本
- 已安装最新版本的
npm - Anthropic API 密钥(Claude)
设置环境
首先,让我们创建并设置我们的项目:# Create project directory
mkdir mcp-client-typescript
cd mcp-client-typescript
# Initialize npm project
npm init -y
# Install dependencies
npm install @anthropic-ai/sdk @modelcontextprotocol/sdk dotenv
# Install dev dependencies
npm install -D @types/node typescript
# Create source file
touch index.ts
package.json 以设置 type: "module" 和一个构建脚本:package.json
{
  "type": "module",
  "scripts": {
    "build": "tsc && chmod 755 build/index.js"
  }
}
tsconfig.json:tsconfig.json
{
  "compilerOptions": {
    "target": "ES2022",
    "module": "Node16",
    "moduleResolution": "Node16",
    "outDir": "./build",
    "rootDir": "./",
    "strict": true,
    "esModuleInterop": true,
    "skipLibCheck": true,
    "forceConsistentCasingInFileNames": true
  },
  "include": ["index.ts"],
  "exclude": ["node_modules"]
}
设置 API 密钥
你需要从 Anthropic Console 获取一个 Anthropic API 密钥。创建一个.env 文件来存储密钥:echo "ANTHROPIC_API_KEY=<your key here>" > .env
.env 添加到 .gitignore:echo ".env" >> .gitignore
确保安全保管你的
ANTHROPIC_API_KEY!创建客户端
基本客户端结构
首先,让我们设置导入并在index.ts 中创建基本的客户端类:import { Anthropic } from "@anthropic-ai/sdk";
import {
MessageParam,
Tool,
} from "@anthropic-ai/sdk/resources/messages/messages.mjs";
import { Client } from "@modelcontextprotocol/sdk/client/index.js";
import { StdioClientTransport } from "@modelcontextprotocol/sdk/client/stdio.js";
import readline from "readline/promises";
import dotenv from "dotenv";
dotenv.config();
const ANTHROPIC_API_KEY = process.env.ANTHROPIC_API_KEY;
if (!ANTHROPIC_API_KEY) {
throw new Error("ANTHROPIC_API_KEY is not set");
}
class MCPClient {
private mcp: Client;
private anthropic: Anthropic;
private transport: StdioClientTransport | null = null;
private tools: Tool[] = [];
constructor() {
this.anthropic = new Anthropic({
apiKey: ANTHROPIC_API_KEY,
});
this.mcp = new Client({ name: "mcp-client-cli", version: "1.0.0" });
}
// methods will go here
}
服务器连接管理
接下来,我们将实现连接到 MCP 服务器的方法:async connectToServer(serverScriptPath: string) {
try {
const isJs = serverScriptPath.endsWith(".js");
const isPy = serverScriptPath.endsWith(".py");
if (!isJs && !isPy) {
throw new Error("Server script must be a .js or .py file");
}
const command = isPy
? process.platform === "win32"
? "python"
: "python3"
: process.execPath;
this.transport = new StdioClientTransport({
command,
args: [serverScriptPath],
});
this.mcp.connect(this.transport);
const toolsResult = await this.mcp.listTools();
this.tools = toolsResult.tools.map((tool) => {
return {
name: tool.name,
description: tool.description,
input_schema: tool.inputSchema,
};
});
console.log(
"Connected to server with tools:",
this.tools.map(({ name }) => name)
);
} catch (e) {
console.log("Failed to connect to MCP server: ", e);
throw e;
}
}
查询处理逻辑
现在让我们添加处理查询和处理工具调用的核心功能:async processQuery(query: string) {
const messages: MessageParam[] = [
{
role: "user",
content: query,
},
];
const response = await this.anthropic.messages.create({
model: "claude-3-5-sonnet-20241022",
max_tokens: 1000,
messages,
tools: this.tools,
});
const finalText = [];
const toolResults = [];
for (const content of response.content) {
if (content.type === "text") {
finalText.push(content.text);
} else if (content.type === "tool_use") {
const toolName = content.name;
const toolArgs = content.input as { [x: string]: unknown } | undefined;
const result = await this.mcp.callTool({
name: toolName,
arguments: toolArgs,
});
toolResults.push(result);
finalText.push(
`[Calling tool ${toolName} with args ${JSON.stringify(toolArgs)}]`
);
messages.push({
role: "user",
content: result.content as string,
});
const response = await this.anthropic.messages.create({
model: "claude-3-5-sonnet-20241022",
max_tokens: 1000,
messages,
});
finalText.push(
response.content[0].type === "text" ? response.content[0].text : ""
);
}
}
return finalText.join("\n");
}
交互式聊天界面
现在我们将添加聊天循环和清理功能:async chatLoop() {
const rl = readline.createInterface({
input: process.stdin,
output: process.stdout,
});
try {
console.log("\nMCP Client Started!");
console.log("Type your queries or 'quit' to exit.");
while (true) {
const message = await rl.question("\nQuery: ");
if (message.toLowerCase() === "quit") {
break;
}
const response = await this.processQuery(message);
console.log("\n" + response);
}
} finally {
rl.close();
}
}
async cleanup() {
await this.mcp.close();
}
主入口点
最后,我们将添加主执行逻辑:async function main() {
if (process.argv.length < 3) {
console.log("Usage: node index.ts <path_to_server_script>");
return;
}
const mcpClient = new MCPClient();
try {
await mcpClient.connectToServer(process.argv[2]);
await mcpClient.chatLoop();
} finally {
await mcpClient.cleanup();
process.exit(0);
}
}
main();
运行客户端
使用任何 MCP 服务器运行你的客户端:# Build TypeScript
npm run build
# Run the client
node build/index.js path/to/server.py # python server
node build/index.js path/to/build/index.js # node server
如果你正在继续服务器快速入门中的天气教程,你的命令可能类似于:
node build/index.js .../quickstart-resources/weather-server-typescript/build/index.js- 连接到指定的服务器
- 列出可用工具
- 启动一个交互式聊天会话,你可以:
- 输入查询
- 查看工具执行
- 获取 Claude 的响应
工作原理
当你提交查询时:- 客户端从服务器获取可用工具列表
- 你的查询连同工具描述一起发送给 Claude
- Claude 决定使用哪些工具(如果有的话)
- 客户端通过服务器执行任何请求的工具调用
- 结果返回给 Claude
- Claude 提供自然语言响应
- 响应显示给你
最佳实践
-
错误处理
- 使用 TypeScript 的类型系统进行更好的错误检测
- 在 try-catch 块中包装工具调用
- 提供有意义的错误消息
- 优雅处理连接问题
-
安全性
- 将 API 密钥安全地存储在
.env中 - 验证服务器响应
- 对工具权限保持谨慎
- 将 API 密钥安全地存储在
故障排除
服务器路径问题
- 仔细检查服务器脚本的路径是否正确
- 如果相对路径不起作用,请使用绝对路径
- 对于 Windows 用户,请确保在路径中使用正斜杠(/)或转义的反斜杠(\)
- 确认服务器文件具有正确的扩展名(Node.js 为 .js 或 Python 为 .py)
# Relative path
node build/index.js ./server/build/index.js

# Absolute path
node build/index.js /Users/username/projects/mcp-server/build/index.js

# Windows path (either format works)
node build/index.js C:/projects/mcp-server/build/index.js
node build/index.js C:\\projects\\mcp-server\\build\\index.js
响应时间
- 第一个响应可能需要长达 30 秒的时间返回
- 这是正常的,发生在:
- 服务器初始化期间
- Claude 处理查询期间
- 工具正在执行期间
- 后续响应通常更快
- 在此初始等待期间不要中断进程
常见错误消息
如果你看到:Error: Cannot find module: 检查你的构建文件夹并确保 TypeScript 编译成功Connection refused: 确保服务器正在运行且路径正确Tool execution failed: 验证工具所需的环境变量是否已设置ANTHROPIC_API_KEY is not set: 检查你的 .env 文件和环境变量TypeError: 确保你使用了正确的工具参数类型
这是一个基于 Spring AI MCP 自动配置和启动启动器的快速入门演示。
要了解如何手动创建同步和异步 MCP 客户端,请查阅 Java SDK 客户端 文档
系统要求
在开始之前,请确保你的系统满足以下要求:- Java 17 或更高版本
- Maven 3.6+
- npx 包管理器
- Anthropic API 密钥(Claude)
- Brave Search API 密钥
设置环境
-
安装 npx(Node Package eXecute):
首先,确保安装了 npm
然后运行:
npm install -g npx -
克隆仓库:
git clone https://github.com/spring-projects/spring-ai-examples.git cd model-context-protocol/brave-chatbot -
设置 API 密钥:
export ANTHROPIC_API_KEY='your-anthropic-api-key-here' export BRAVE_API_KEY='your-brave-api-key-here' -
构建应用程序:
./mvnw clean install -
使用 Maven 运行应用程序:
./mvnw spring-boot:run
确保安全保管你的
ANTHROPIC_API_KEY 和 BRAVE_API_KEY 密钥!工作原理
该应用程序通过几个组件将 Spring AI 与 Brave Search MCP 服务器集成:MCP 客户端配置
- 在 pom.xml 中的必需依赖项:
<dependency>
    <groupId>org.springframework.ai</groupId>
    <artifactId>spring-ai-starter-mcp-client</artifactId>
</dependency>
<dependency>
    <groupId>org.springframework.ai</groupId>
    <artifactId>spring-ai-starter-model-anthropic</artifactId>
</dependency>
- 应用程序属性(application.yml):
spring:
  ai:
    mcp:
      client:
        enabled: true
        name: brave-search-client
        version: 1.0.0
        type: SYNC
        request-timeout: 20s
        stdio:
          root-change-notification: true
          servers-configuration: classpath:/mcp-servers-config.json
    anthropic:
      api-key: ${ANTHROPIC_API_KEY}
spring-ai-starter-mcp-client 以根据提供的服务器配置创建一个或多个 McpClient。- MCP 服务器配置(
mcp-servers-config.json):
{
  "mcpServers": {
    "brave-search": {
      "command": "npx",
      "args": [
        "-y",
        "@modelcontextprotocol/server-brave-search"
      ],
      "env": {
        "BRAVE_API_KEY": "<PUT YOUR BRAVE API KEY>"
      }
    }
  }
}
聊天实现
聊天机器人使用 Spring AI 的 ChatClient 与 MCP 工具集成实现:var chatClient = chatClientBuilder
.defaultSystem("You are useful assistant, expert in AI and Java.")
.defaultTools((Object[]) mcpToolAdapter.toolCallbacks())
.defaultAdvisors(new MessageChatMemoryAdvisor(new InMemoryChatMemory()))
.build();
- 使用 Claude AI 模型进行自然语言理解
- 通过 MCP 集成 Brave Search 以实现实时网络搜索功能
- 使用 InMemoryChatMemory 维护对话记忆
- 作为交互式命令行应用程序运行
构建和运行
./mvnw clean install
java -jar ./target/ai-mcp-brave-chatbot-0.0.1-SNAPSHOT.jar
./mvnw spring-boot:run
- 使用其内置知识回答问题
- 在需要时使用 Brave Search 进行网络搜索
- 记住对话中的上下文
- 结合多个来源的信息提供全面的答案
高级配置
MCP 客户端支持其他配置选项:- 通过
McpSyncClientCustomizer或McpAsyncClientCustomizer自定义客户端 - 多个客户端与多种传输类型:
STDIO和SSE(服务器发送事件) - 与 Spring AI 的工具执行框架集成
- 自动客户端初始化和生命周期管理
<dependency>
    <groupId>org.springframework.ai</groupId>
    <artifactId>spring-ai-mcp-client-webflux-spring-boot-starter</artifactId>
</dependency>
你可以在这里找到本教程的完整代码。现在,让我们创建并设置你的项目:运行 还要将以下插件添加到你的构建脚本中:还要创建一个辅助函数,将 客户端将:
系统要求
在开始之前,请确保你的系统满足以下要求:- Java 17 或更高版本
- Anthropic API 密钥(Claude)
设置环境
首先,如果你还没有安装java 和 gradle,请先安装它们。
你可以从 Oracle JDK 官方网站 下载 java。
验证你的 java 安装:java --version
# Create a new directory for our project
mkdir kotlin-mcp-client
cd kotlin-mcp-client

# Initialize a new kotlin project
gradle init
gradle init 后,你将看到创建项目的选项。
选择 Application 作为项目类型,Kotlin 作为编程语言,Java 17 作为 Java 版本。或者,你可以使用 IntelliJ IDEA 项目向导 创建一个 Kotlin 应用程序。创建项目后,添加以下依赖项:val mcpVersion = "0.4.0"
val slf4jVersion = "2.0.9"
val anthropicVersion = "0.8.0"
dependencies {
implementation("io.modelcontextprotocol:kotlin-sdk:$mcpVersion")
implementation("org.slf4j:slf4j-nop:$slf4jVersion")
implementation("com.anthropic:anthropic-java:$anthropicVersion")
}
plugins {
    id("com.github.johnrengelman.shadow") version "8.1.1"
}
设置 API 密钥
你需要从 Anthropic Console 获取一个 Anthropic API 密钥。设置你的 API 密钥:export ANTHROPIC_API_KEY='your-anthropic-api-key-here'
确保安全保管你的
ANTHROPIC_API_KEY!创建客户端
基本客户端结构
首先,让我们创建基本的客户端类:class MCPClient : AutoCloseable {
private val anthropic = AnthropicOkHttpClient.fromEnv()
private val mcp: Client = Client(clientInfo = Implementation(name = "mcp-client-cli", version = "1.0.0"))
private lateinit var tools: List<ToolUnion>
// methods will go here
override fun close() {
runBlocking {
mcp.close()
anthropic.close()
}
}
服务器连接管理
接下来,我们将实现连接到 MCP 服务器的方法:suspend fun connectToServer(serverScriptPath: String) {
try {
val command = buildList {
when (serverScriptPath.substringAfterLast(".")) {
"js" -> add("node")
"py" -> add(if (System.getProperty("os.name").lowercase().contains("win")) "python" else "python3")
"jar" -> addAll(listOf("java", "-jar"))
else -> throw IllegalArgumentException("Server script must be a .js, .py or .jar file")
}
add(serverScriptPath)
}
val process = ProcessBuilder(command).start()
val transport = StdioClientTransport(
input = process.inputStream.asSource().buffered(),
output = process.outputStream.asSink().buffered()
)
mcp.connect(transport)
val toolsResult = mcp.listTools()
tools = toolsResult?.tools?.map { tool ->
ToolUnion.ofTool(
Tool.builder()
.name(tool.name)
.description(tool.description ?: "")
.inputSchema(
Tool.InputSchema.builder()
.type(JsonValue.from(tool.inputSchema.type))
.properties(tool.inputSchema.properties.toJsonValue())
.putAdditionalProperty("required", JsonValue.from(tool.inputSchema.required))
.build()
)
.build()
)
} ?: emptyList()
println("Connected to server with tools: ${tools.joinToString(", ") { it.tool().get().name() }}")
} catch (e: Exception) {
println("Failed to connect to MCP server: $e")
throw e
}
}
JsonObject 转换为 Anthropic 的 JsonValue:private fun JsonObject.toJsonValue(): JsonValue {
val mapper = ObjectMapper()
val node = mapper.readTree(this.toString())
return JsonValue.fromJsonNode(node)
}
查询处理逻辑
现在让我们添加处理查询和处理工具调用的核心功能:private val messageParamsBuilder: MessageCreateParams.Builder = MessageCreateParams.builder()
.model(Model.CLAUDE_3_5_SONNET_20241022)
.maxTokens(1024)
suspend fun processQuery(query: String): String {
val messages = mutableListOf(
MessageParam.builder()
.role(MessageParam.Role.USER)
.content(query)
.build()
)
val response = anthropic.messages().create(
messageParamsBuilder
.messages(messages)
.tools(tools)
.build()
)
val finalText = mutableListOf<String>()
response.content().forEach { content ->
when {
content.isText() -> finalText.add(content.text().getOrNull()?.text() ?: "")
content.isToolUse() -> {
val toolName = content.toolUse().get().name()
val toolArgs =
content.toolUse().get()._input().convert(object : TypeReference<Map<String, JsonValue>>() {})
val result = mcp.callTool(
name = toolName,
arguments = toolArgs ?: emptyMap()
)
finalText.add("[Calling tool $toolName with args $toolArgs]")
messages.add(
MessageParam.builder()
.role(MessageParam.Role.USER)
.content(
"""
"type": "tool_result",
"tool_name": $toolName,
"result": ${result?.content?.joinToString("\n") { (it as TextContent).text ?: "" }}
""".trimIndent()
)
.build()
)
val aiResponse = anthropic.messages().create(
messageParamsBuilder
.messages(messages)
.build()
)
finalText.add(aiResponse.content().first().text().getOrNull()?.text() ?: "")
}
}
}
return finalText.joinToString("\n", prefix = "", postfix = "")
}
交互式聊天
我们将添加聊天循环:suspend fun chatLoop() {
println("\nMCP Client Started!")
println("Type your queries or 'quit' to exit.")
while (true) {
print("\nQuery: ")
val message = readLine() ?: break
if (message.lowercase() == "quit") break
val response = processQuery(message)
println("\n$response")
}
}
主入口点
最后,我们将添加主执行函数:fun main(args: Array<String>) = runBlocking {
if (args.isEmpty()) throw IllegalArgumentException("Usage: java -jar <your_path>/build/libs/kotlin-mcp-client-0.1.0-all.jar <path_to_server_script>")
val serverPath = args.first()
val client = MCPClient()
client.use {
client.connectToServer(serverPath)
client.chatLoop()
}
}
运行客户端
使用任何 MCP 服务器运行你的客户端:./gradlew build
# Run the client
java -jar build/libs/<your-jar-name>.jar path/to/server.jar # jvm server
java -jar build/libs/<your-jar-name>.jar path/to/server.py # python server
java -jar build/libs/<your-jar-name>.jar path/to/build/index.js # node server
如果你正在继续服务器快速入门中的天气教程,你的命令可能类似于:
java -jar build/libs/kotlin-mcp-client-0.1.0-all.jar .../samples/weather-stdio-server/build/libs/weather-stdio-server-0.1.0-all.jar- 连接到指定的服务器
- 列出可用工具
- 启动一个交互式聊天会话,你可以:
- 输入查询
- 查看工具执行
- 获取 Claude 的响应
工作原理
以下是一个高层次的工作流程图:当你提交查询时:- 客户端从服务器获取可用工具列表
- 你的查询连同工具描述一起发送给 Claude
- Claude 决定使用哪些工具(如果有的话)
- 客户端通过服务器执行任何请求的工具调用
- 结果返回给 Claude
- Claude 提供自然语言响应
- 响应显示给你
最佳实践
-
错误处理
- 利用 Kotlin 的类型系统显式建模错误
- 在可能出现异常的地方包装外部工具和 API 调用
- 提供清晰且有意义的错误消息
- 优雅处理网络超时和连接问题
-
安全性
- 将 API 密钥和机密信息安全地存储在
local.properties、环境变量或秘密管理器中 - 验证所有外部响应以避免意外或不安全的数据使用
- 在使用工具时对权限和信任边界保持谨慎
- 将 API 密钥和机密信息安全地存储在
故障排除
服务器路径问题
- 仔细检查服务器脚本的路径是否正确
- 如果相对路径不起作用,请使用绝对路径
- 对于 Windows 用户,请确保在路径中使用正斜杠(/)或转义的反斜杠(\)
- 确保已安装所需的运行时(Java 用于 Java,npm 用于 Node.js,或 uv 用于 Python)
- 确认服务器文件具有正确的扩展名(Java 为 .jar,Node.js 为 .js 或 Python 为 .py)
# Relative path
java -jar build/libs/client.jar ./server/build/libs/server.jar

# Absolute path
java -jar build/libs/client.jar /Users/username/projects/mcp-server/build/libs/server.jar

# Windows path (either format works)
java -jar build/libs/client.jar C:/projects/mcp-server/build/libs/server.jar
java -jar build/libs/client.jar C:\\projects\\mcp-server\\build\\libs\\server.jar
响应时间
- 第一个响应可能需要长达 30 秒的时间返回
- 这是正常的,发生在:
- 服务器初始化期间
- Claude 处理查询期间
- 工具正在执行期间
- 后续响应通常更快
- 在此初始等待期间不要中断进程
常见错误消息
如果你看到:Connection refused: 确保服务器正在运行且路径正确Tool execution failed: 验证工具所需的环境变量是否已设置ANTHROPIC_API_KEY is not set: 检查你的环境变量
你可以在这里找到本教程的完整代码。然后,将所需的依赖项添加到你的项目中:这将创建一个可以从用户机密中读取 API 密钥的 .NET 控制台应用程序的开端。接下来,我们将设置 MCP 客户端:这将配置一个 MCP 客户端,该客户端将连接到作为命令行参数提供的服务器。然后,它列出来自连接服务器的可用工具。客户端将: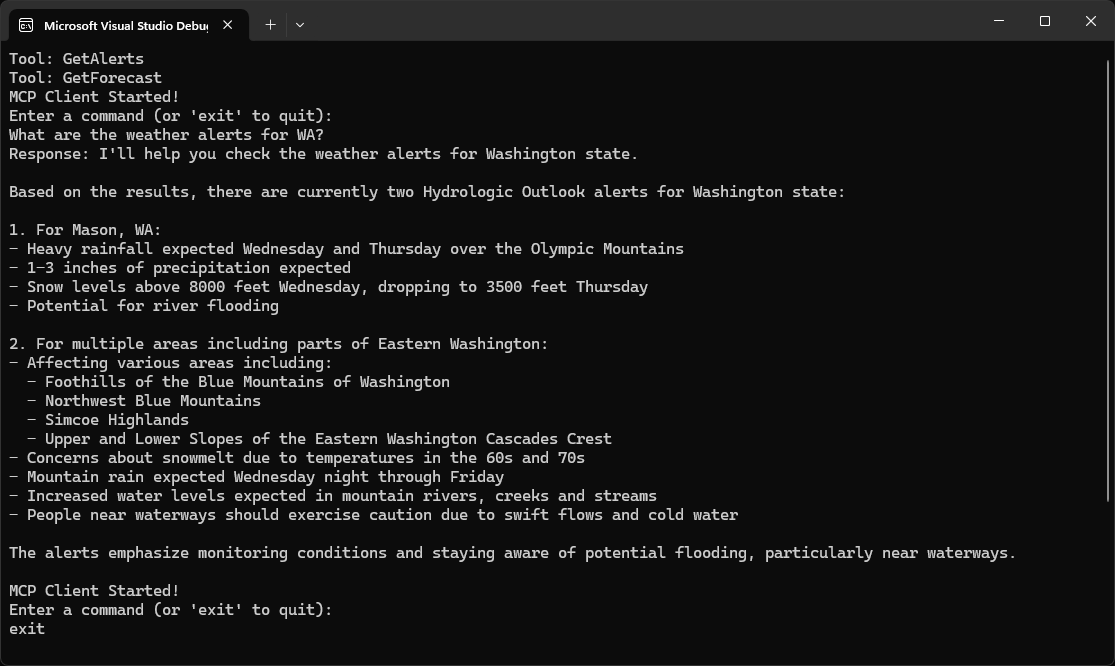
系统要求
在开始之前,请确保你的系统满足以下要求:- .NET 8.0 或更高版本
- Anthropic API 密钥(Claude)
- Windows、Linux 或 MacOS
设置环境
首先,创建一个新的 .NET 项目:dotnet new console -n QuickstartClient
cd QuickstartClient
dotnet add package ModelContextProtocol --prerelease
dotnet add package Anthropic.SDK
dotnet add package Microsoft.Extensions.Hosting
设置 API 密钥
你需要从 Anthropic Console 获取一个 Anthropic API 密钥。dotnet user-secrets init
dotnet user-secrets set "ANTHROPIC_API_KEY" "<your key here>"
创建客户端
基本客户端结构
首先,让我们设置基本的客户端类:using Microsoft.Extensions.Configuration;
using Microsoft.Extensions.Hosting;
var builder = Host.CreateEmptyApplicationBuilder(settings: null);
builder.Configuration
.AddUserSecrets<Program>();
var (command, arguments) = args switch
{
    [var script] when script.EndsWith(".py") => ("python", script),
    [var script] when script.EndsWith(".js") => ("node", script),
    [var script] when Directory.Exists(script) || (File.Exists(script) && script.EndsWith(".csproj")) => ("dotnet", $"run --project {script} --no-build"),
    _ => throw new NotSupportedException("An unsupported server script was provided. Supported scripts are .py, .js, or .csproj")
};

await using var mcpClient = await McpClientFactory.CreateAsync(new()
{
    Id = "demo-server",
    Name = "Demo Server",
    TransportType = TransportTypes.StdIo,
    TransportOptions = new()
    {
        ["command"] = command,
        ["arguments"] = arguments,
    }
});

var tools = await mcpClient.ListToolsAsync();
foreach (var tool in tools)
{
    Console.WriteLine($"Connected to server with tools: {tool.Name}");
}
请确保添加命名空间的
using 语句:using ModelContextProtocol.Client;
using ModelContextProtocol.Protocol.Transport;
查询处理逻辑
现在让我们添加处理查询和处理工具调用的核心功能:using IChatClient anthropicClient = new AnthropicClient(new APIAuthentication(builder.Configuration["ANTHROPIC_API_KEY"]))
.Messages
.AsBuilder()
.UseFunctionInvocation()
.Build();
var options = new ChatOptions
{
MaxOutputTokens = 1000,
ModelId = "claude-3-5-sonnet-20241022",
Tools = [.. tools]
};
while (true)
{
Console.WriteLine("MCP Client Started!");
Console.WriteLine("Type your queries or 'quit' to exit.");
string? query = Console.ReadLine();
if (string.IsNullOrWhiteSpace(query))
{
continue;
}
if (string.Equals(query, "quit", StringComparison.OrdinalIgnoreCase))
{
break;
}
var response = anthropicClient.GetStreamingResponseAsync(query, options);
await foreach (var message in response)
{
Console.Write(message.Text);
}
Console.WriteLine();
}
关键组件解释
1. 客户端初始化
- 客户端使用
McpClientFactory.CreateAsync()初始化,设置传输类型和运行服务器的命令。
2. 服务器连接
- 支持 Python、Node.js 和 .NET 服务器。
- 使用参数中指定的命令启动服务器。
- 配置为使用 stdio 与服务器通信。
- 初始化会话和可用工具。
3. 查询处理
- 利用 Microsoft.Extensions.AI 进行聊天客户端。
- 配置
IChatClient以使用自动工具(函数)调用。 - 客户端读取用户输入并将其发送到服务器。
- 服务器处理查询并返回响应。
- 响应显示给用户。
运行客户端
使用任何 MCP 服务器运行你的客户端:dotnet run -- path/to/server.csproj # dotnet server
dotnet run -- path/to/server.py # python server
dotnet run -- path/to/server.js # node server
如果你正在继续服务器快速入门中的天气教程,你的命令可能类似于:
dotnet run -- path/to/QuickstartWeatherServer。- 连接到指定的服务器
- 列出可用工具
- 启动一个交互式聊天会话,你可以:
- 输入查询
- 查看工具执行
- 获取 Claude 的响应
- 完成后退出会话
下一步
示例服务器
查看我们的官方 MCP 服务器和实现的画廊
客户端
查看支持 MCP 集成的客户端列表
使用 LLM 构建 MCP
了解如何使用 LLM(如 Claude)加速你的 MCP 开发
核心架构
了解 MCP 如何连接客户端、服务器和 LLM